Sunday, November 29, 2009

Thanksgiving Dinner

What an unproductive weekend.
Dinner was nice this year, though; a small family gathering.


Pickled Vegetables. A bit non-traditional, but still very delicious, courtesy of my Aunt.
Super delicious salad starter was created my older cousin. Actually, I think most everything was prepared by the two.


Poor turkey didn't stand a chance.

Saturday, July 11, 2009

An Attempt @ Puff Pastry

Summer...is hot. With summer, however, comes a lot of recipes that have berries featured as the star of a dish. As I was browsing the internet, I happened to stumble across one such recipe on the Baker's Banter, by King Arthur Flour.

Now, what did I find? A recipe for Raspberry Turnovers! They looked so good I just had to try making some. First hurdle? Make some puff pastry; I didn't want to go and buy any and I had all the ingredients to make it (Wtf? The heat! Why do that to yourself?). So after a few days of researching around online for recipes and instructions regarding this intimidating foe, I rolled up my sleeves and set out to make it! Didn't take any pictures of the ordeal though because I was a bit preoccupied with it and forgot~ Yeah, sadness.

I guess it was super humid 'cause I had a lot of trouble with the dough sticking when I was trying to roll it out and it ate the flour on the rolling surface like a demon. In the end, I finally made it, wrapped it up, and left it to chill in the fridge for 1.5 days ('cause I didn't really want to think about it or do anything with it after the experience of making it). I can confess that I was super worried about how it would turn out. I thought it was gonna just be one flat piece of dough when I finally baked it off.

Anyway, I didn't really have any frozen berries in the fridge 'cause I neglected to buy any...but I did have 2 medium/small sweet onions that I needed to use up. SO, "if like gives you lemons, make lemonade" right? I sauteed the onions til they were soft and caramelized, seasoned with oregano, smoked paprika, salt, coarse black pepper, garlic, and balsamic vinegar. Finished that and stuck it in the fridge too.


Ugh. Okay, in the end, I did manage to make it! Talk about scary experience. Rolling the dough out at the end to prep for the stuffing and baking was a nightmare. Was getting soft fast, and sticking to boot. I ended up just getting it rolled out, not trimmed it, cut to enough divisions, stuffed, not sealed properly, egg washed, and into the oven. I watched as the butter in the dough started to melt, transforming it into a soft, melted looking pile of stuff. Checked back later after much brooding and I saw it had some layers! Hurray! Some kind of success!!!

Results!:

Moral of this scary story? That there is hope and you too can make your own puff pastry! I mean, did you read what I went through to make this? I even cut out some more drama to make this entry pithy. I would say try it, just because experiences always add to our understanding of things.
Look at those beautiful buttery flakes!

Sunday, May 10, 2009

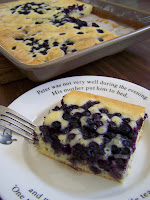
For Mother's Day: Blueberry Cream Cake

So~ my mom loves blueberries, which is interesting because she wasn't always a fan of fruits (didn't know this until I was older; her reasoning was that if she showed that she didn't like most fruits or veggies we would grow up like her too, lol). Anyway, so I was supposed to make this the day before Mother's Day but I didn't have the ingredients to do it and in the morning I didn't have enough time to bake before she came to my appartment.


This was an experimental cake too. Aren't experiments just the greatest? Yes, back on track. It's experimental because I used heavy cream for fat instead of butter. I did some googling to figure out if such a substitute was reasonable, but didn't come up with too much except one recipe for a "Sweet Cream Cake." So I took that one, wrote a few
tagline notes and went at making my Mother's Day cake, hoping for the best results of course.


Lucky me, it turned out great!


Blueberry Cream Cake

-1 2/3 Cup All Purpose Flour

-2 1/2 Tsp. Baking Poweder

-2/3 Tsp. Salt

-Zest from 1 Med. Lemon

-2 Eggs

-1 Cup Sugar

-1 Tsp. Vanilla Extract

-Just a bit over 3/4 Cup Heavy Cream + 2% Greek Yoghurt (or more cream or another sour cream, etc.) = Total 1 Cup

-2 Cups Frozen Wild Blueberries

  1. Preheat oven to 350 F. Line, spray, and flour a 9x12 baking pan.
  2. Beat eggs until well broken up, then add sugar gradually and beat until light in color and well incorporated. Add lemon zest and beat until incorporated.
  3. Sift flour, baking powder, salt together into a separate bowl. Combine vanilla extract, heavy cream/yoghurt mixture together in a measuing cup (for ease of pouring).
  4. Alternately add dry and cream mixture to the egg mixture (about 3 sets) and, using a paddle, mix after each set of additions until nicely incorporated. Pour and spread in an even layer onto the baking pan. Distribute the blueberries over the cake batter, leaving some on top and pushing some into the batter itself so there is a nice distribution throughout. (I guess the alternative would be to coat half of the frozen blueberries with flour and mixing them carefully into the batter to avoid major color bleeding, then sprinkle the rest on the top after spreading it out).
  5. Bake on middle shelf for 25-30 minutes or until toothpick inserted in the center comes out clean. Rotate once during baking. (If necessary, turn the oven to 325F 10 minutes before time is up if you feel your oven is browning/burning it faster that it is cooking and bake until toothpick inserted in center comes out clean.)
  6. Remove and let cool for 30 minutes in pan before cutting. Serves ~12-18 depending on how you slice it.

Enjoy~

Tuesday, February 24, 2009

Lemon Cranberry Pecan Biscotti

Yeah, I had a major biscotti phase...and I still do!

Well, I did a lot of searching around in cookbooks and online for a recipe that I liked. Took a while and I looked for similarities in the recipes. I learned a few things though, which is always really good. So there are three kinds of biscotti base dough substance recipes: whole eggs only, egg and butter, or egg white only.
I happened to have my American's Test Kitchen book on hand and one major difference would be texture and the other is taste. Hard, light, with a pleasant snap and crunch (but not hard enough to break a tooth...unless you're careless) and has a flavor that improves with time after baking; lasts longer than the ones made with butter. Softer and more fragrant aroma with a nice cruch not as prominent as the whole egg one though; loses flavor over time. Break a tooth hard...forgot what it said about flavor though, but I imagine that it wouldn't be as strong as the other two.

In the end, I opted to make the ones that called for whole eggs. Reasons? I'm a busy college student that doesn't want anything to go rancid over time, hehe. I'm not a major fan of butter either and I don't like the residue it leaves on the fingers and lips.

I actually made two by the book recipe biscottis to test out how to make biscottis, and it took a while but I think I got the hang of it by the 3rd or 4th time I tried it. I made an orange honey, a chocolate pistachio, and pecan cranberry; I know, thats three. What did I learn? 1. Ones without any filling are harder to handle and shape and probably cook faster, 2. chocolate pieces don't improve the texture of a whole egg biscotti because it interferes with the crunch factor, 3. pecans, cranberries, and lemon are the best combo of ingredients I have ever tasted. Note: anytime I mention a citrus fruit, I'm refering to the zest of it. Most recipes called for some kind of zest, either lemon or orange.


Result of all this experimentation? Developing a really great Lemon Pecan Cranberry biscotti with a nice bite and flavor that grows over the couple days after you make them. They are great with a beverage because the hardness stands up to soaking, and may be better for those who don't like such hard cookies.

Lemon Scented Cranberry Pecan Biscotti
  • 2 1/2 cups of unbleached all purpose flour
  • 1 tsp baking powder
  • 1/4 tsp of salt
  • 1 cup dried cranberries (Craisens are good)
  • 1 cup of chopped and toasted pecans
  • 3 large eggs
  • 2/3 cups granulated sugar
  • 1 tsp vanilla extract
  • Zest of 1 medium lemon (or large if you really want)
1. Preheat oven to 350 F. Line 2 baking sheets with parchment and set aside (second one is for later).
2. Combine flour, baking powder, and salt in a bowl. Set aside.
3. Beat eggs with whisk in a mixter, or by hand, until relatively broken down. Add granulated sugar and beat until combined and just dissolved. Add zest and vanilla extract and mix again until everything is well combined.
4. Remove bowl from mixer. Add flour mixture in third portions. Mix each third portion into wet mixture until semi-combined and then add the next. When last third of dry mixture in almost combined add cranberries and pecans. Stir until just well combined.
5. Devide the batter in two and shape each portion into 12"x2" logs. Wetting your hands slightly makes this easier because the batter is a little sticky.
6. Place in oven on middle rack and bake for 20~25 minutes, or until pale golden and cracked on top. Rotate baking sheet halfway through baking time for even browning.
7. Turn oven down to 275 F. Remove and cool on sheets for 5 minutes, then remove and cool for another 10 or 15 minutes. The longer it is cooled the easier it will be to slice without messing up the center too much. Use a serrated knife or bread knife and cut at an angle 1/4" slices. Lay the slices flat on parchmented baking sheets and return to oven on upper 1/3rd and lower 1/3rd of oven to bake for 15 minutes. After this, remove and turn the slices over to toast the other side. Return to oven for 15 more minutes or until biscotti is dry. The color should still be pale or the color they looked when they were first sliced. The idea is to dry them out, not brown.
8. Cool on cooling rack and make sure it is completely cooled before putting them into a container or packaging of any kind. From what I understand, they last a few weeks in an airtight container, if they last that long.

Saturday, November 29, 2008

White Mushroom Spaghetti


This was my first attempt at making a pasta dish that didn't have any tomato related ingredient in the sauce. It sauce pretty much consisted of white mushrooms, garlic, oregano, salt and pepper, oil, and butter. It's a shame I'm not old enough to get some white wine, it would have been perfect.


The mushrooms looked amazing so I decided it would be a good idea to get some. Sorry, but I forgot to take pictures of them before I sliced, diced, and cooked them.

White Mushroom Pasta:


12 oz. of White Mushrooms, about (or more if you like)


5 cloves of garlic, minced


Quarter of a small-medium onion, diced


1 tsp dried oregano


2 tbsp of Olive Oil (or any other kind you have)


4 tbsp of butter


1 tsp, or more, of salt (to taste)


1/2 pack of regular length spaghetti, roughly


Black pepper (optional/to taste)


Basil, roughly chopped (optional)

Rinse and wash the mushrooms under cold running water. And set aside to dry, or you can pat dry. Then slice them into thin, approx. 2-3mm, even slices. Set aside. (The slicing can all be done while you wait for the water to boil)


Bring a large, covered, pot of water to boil. Once boiling, uncover and throw in the dried spaghetti. Stir in and let cook as package directs. Stir occasionally.

While the pasta is cooking, heat oil in a large, raised sides, pan. When heated, cook garlic for about 30 secs or until fragrant on medium-high heat, then throw in the onions and oregano and cook until browned and softened slightly, maybe about 3 minutes on medium-high heat.

Once onions are browned and softened, throw in the sliced mushrooms. Saute for a a minute or two and then cover, turn heat to medium, and let the mushrooms release their moisture. After about 5-7 minutes, check and stir. They should have lost a lot of their opaqueness. Now uncover, turn heat back to medium-high, add salt, and saute untill some moisture has evaporated, but not completely. Add the butter and stir in until all melted. Lower heat to medium-low.

At this point the pasta should be done. Drain and add pasta to the sauce. Mix well until the pasta is well coated. Add basil, and pepper (if using). Serve immediately.

Serves ~4

Enjoy!

Sunday, October 26, 2008

"Rustic" Pumpkin Pie: Avoiding Textbooks

So~ I didn't want to study today, and now I'm behind again...but it was worth it! I decided to bake Pumpkin Pie! I experimented with the recipe I looked up too...very little variation, I just used 2 cans of Carnation's 5 oz. evaporated milk instead of a 12oz. can because last time I did that I had extra filling...I don't like to have extra filling...yes. It would have been such a waste, right?


I also only used 1 tsp. of Pumpkin Pie Spice, and added 1 tsp of fresh grated ginger. Yummy! It turned out nice! I also added only 2 large eggs instead of 2 egg whites and 1 whole egg. All good.


For some reason though, the pie surface cracked, a lot. Therefore! I call it "rustic". Isn't it great how one word fixes everything?


3/4 cup of Brown Sugar


1/4 tsp. Salt


1 tsp. Pumpkin Pie Spice


1 tsp. Freshly Grated Ginger


2 Large Eggs


2 (5 oz.) cans of Evaporated Milk


1 (15 oz.) can of Usweetened Pumpkin


1 Pre-made Deep Dish Pie Crust, like Pillsbury


  1. Preheat oven to 450F degrees

  2. Prepare a rack on the lower shelf of the oven and put a baking sheet on this lower level.

  3. Mix/Whisk/Blend Brown Sugar through Evaporated Milk together in a bowl. Add Pumpkin and mix till well combined.

  4. Pour into Pie Crust, place in oven on top of a baking sheet (for cleanliness and in case of spills. I would put the crust on the baking sheet in the oven BEFORE pouring the mixture in, makes it easier since you don't have to pick it up and balance the liquid inside on the way to the oven).

  5. Bake at 450F for about 10 minutes. Rotate. Turn temperature to 350F degrees and bake for 40-50 minutes or until a knife inserted into the center comes out clean.


I have a feeling that if I baked it at 325 instead of 350 the pie would'nt have cracked so much...but oh well, it tasted good to me so I don't really care, haha.

Wednesday, October 22, 2008

Finally, Something New: Chili


Man, it has definitely been a while since I last posted.

So~ I managed to drag my butt out of bed a few saturdays ago to go to the farmers market near my apartment complex and I bought an interesting new chili. BUT, I forgot to take a picture of the finished product...so I need to do that at some point later on. Wait for it!~

Well, I guess it isn't that new or interesting for someone thats eaten a sweet white pepper before, but it was interesting to me! I forgot the exact name of this particular chili pepper, but it was really sweet! I mean, I just licked a piece of the pepper just to taste it and I could taste the full impact of sweetness! But I forgot about how sweet the peppers were and I added just a little too much honey, hehe. Go figure.

Tomatoes were getting a bit irritating to buy because I thought a lot of the prices were a bit expensive, but I guess it's worth it for fresh tomatoes. I saw a stand selling heirlooms for about $3.50 lb but I didn't have enough time or money get it that weekend. Next weekend for sure! The tomatoes I finally settled on were really sweet too. A shame that most all of them went into making the chili. I would have eaten them all raw, haha.

So, I used a combination of: sweet white peppers, orange bell peppers, a jalapeno (my sister can't really handle too much heat) and some Anaheim peppers. I was going to add Pasilla but the ones I had in the fridge kinda went south and I didn't see it until I got back from the market. Poo~

Spices: Chili powder, Smoked paprika, Cumin
Canned: White and Dark Kidney Beans, Tomato Paste